Saturday, 9 March 2013

Different faces of music

The four images below represent my attempts at using masks. Thanks to masking, I have achieved an effect which depicts different types of backgrounds. This draws the viewer attention and makes the images more interesting to look at. Also, I've tried to grasp different point of views because it is difficult to portray the whole piece of equipment in one image and keep it stimulating and catching. So the symbol of music can be shown in various ways...


Inspiration for the two photos below was a Johnny Cash cover for one of his albums (see below). 


I've used the studio for these photos; more specifically, I've used flash with snoot, covered by blue jelly transparent sheet. The background was black. One of the sources of light was behind Abdul (hence the light falling on his neck and the rear part of his head). Thanks to the use of softbox, the light covers only the front part of his face, while the lateral part is in low key; both contribute to the moody effect, and so does the blue light.


Friday, 8 March 2013

Creative Digital Montage


The above images are the result of the digital montage project:

  • planning the montage and selecting materials - my focus of interest for this project was Northern Quarters area due to its cultural and social vividness and diversity. The plan involved walking around the area and shooting images of places which were in some way unique or peculiar, for example, graffiti, sculptures and posters. The second phase of the plan involved going through the images and selecting most relevant images. The final phase of the plan consisted of using selected images (or their parts) to digitally montage three new images which portray complex nature of the atmosphere in the Northern Quarters area.
  • having research numerous contributors in creative digital montage, I was inspired by James Van Der Zee. Although he was active well before digital imagery was popular and widespread, one of his mottoes was 'I wanted to make the camera take what I though should be there'. Therefore, I used this as guidance in producing what clearly is a more mental image of the Manchester city centre.  
  • the message and the audience - the digitally montaged images aim to demonstrate uniqueness of the area on different levels and in many respects. On the one hand, we have plenty of small pubs with local bands performing every night. On the other, we have exhibitions and street life (visible in graffiti, posters, mosaics, wall paintings and street artists). The area also has a social dimension, with many bazaar vendors trying to sell, for instance, second-hand music equipment. The target audience for this project is anyone who is interested in exploring the Manchester city center not only in person but also through the lenses of a camera. The target audience also involves those who want to see a different view of Manchester city centre, i.e. as a collage of images and memories. 
  • images selected for the project - out of numerous photos taken for this project, seven were selected on the basis of common theme, i.e. representations of art. In this case, the photos involved those representing historic buildings, graffiti, sculpture and music instrument, so these elements which somehow evoke an aesthetic response in the viewer's mind. 
  • image editing and manipulation techniques - masks and layers were the two main Photoshop features which I used in this case. These enabled me to combine (elements of) two or more images to create a new one. For example, in the second image, we have three elements (layers): the view of historic buildings, the guitar and a dragon sculpture. The masking techniques (and 'opacity level' feature) appeared to be useful in blending three images into one, in this way allowing me to show three items which normally do not occur in their vicinity, such as a massive red guitar in the foreground of the image. Faded faces in the pictures mean that Manchester also has a social dimension, i.e. its inhabitants, but they are by no means the main one, since the city also lives its own life thanks to its cultural (music) artifacts and historic buildings in the city centre. 
  • Moreover, cropping and re-sizing were useful features enabling me to  adjust the size of the given element to fit the whole image. For instance, in the last image, the faded image of the guitar had to be adjusted in terms of size so that it does not go beyond the image and that it constitutes effective (yet faded) background to the graffiti image. This also required using a bit of sharpening so that segments of the image were more conspicuous. Finally, colour manipulation turned out to be exceptionally useful because the montage was done from both b&w pictures, as well as coloured ones. The mixture of colours (and colour modes) contributed to the vivid and abstract character of the images, even though most of them are kept in cold tones. 

Saturday, 2 March 2013

Studio project


Looking into...
F/7.1; Exposure 1/60; ISO/100

This picture was taken in a home studio, where I used soft box light and main light to make half of the face brighter than the other one, although I still tried to keep the whole face in focus. This helped me to achieve a moody effect of a personality consisting of two sides: bright and dark. The mask is a symbol of posture we assume to hide our true personality.The use of both beauty dish and soft-box was helpful in achieving good contrast and well-defined facial features. 


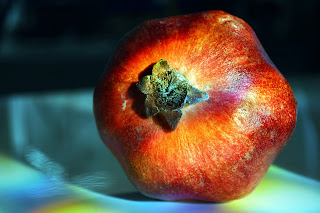
Pomegranate
F/5.6; Exposure 1/20; ISO/100

This is an example of creative photography. The play with lighting and colour is supposed to make the subject matter more vivid. The choice of aperture ensures that the focus is placed primarily on the fruit, whereas the blurred table serves as the perfect background which does not distract the viewer. At the same time, the sublime shadow makes it easier for the viewer to locate the fruit in space. Honeycomb grids create a colorful effect of light beams. 


Orchids
F/25; Exposure 1/25; ISO/100

The aim of using the F/25 aperture was to provide a large depth of field so that each detail of the petal is clear and visible. The rear light could have been adjusted slightly differently to make sure that all the flowers receive similar lighting. As it stands, the upper left corner of the image (together with its petal) is somewhat dark. 


Jewelry
F/5.6; Exposure 1/60; ISO/100

The fact that I used only one source of lighting (i.e. flash) posed quite a challenge getting the right focus. The glass surface with scratches slightly disrupt the viewer's attention. However, I still managed to create a good bokeh by deciding on a short depth of field and putting the largest element of the jewelry in focus. 


Purple flowers
F/20; Exposure 1/100; ISO/100

This composition is about combination of extremes. Extreme tones are supposed to match the clear and crispy texture of the wooden background. At the same time, it is about life (organic flower) and  lifeless matter (wooden plank). The vivid texture of both foreground and background was achieved with a high F value. 

Glassware
F/18; Exposure 1/160; ISO/100

The high F value adds a large depth of field to the image and allows the viewer to visually explore the twirls inside the glassware. Although the exposure time was short, I still used the tripod to avoid the motion blur which would have spoiled the crispy texture and detail of the glassware. I also managed to keep the bottom edge visible despite the low key.


Commercial photography
F/5.6; Exposure 1/60; ISO/100

I used a short depth of field on purpose to avoid getting glass scratches into focus. Thanks to this the coffee beans on the glass surface look very lively. The blurred objects beneath the glass table are old cameras. The light positioned in the rear part of the set was used to slightly dim the background, which matches the dark tones of the coffee beans. But at the same time, the external flash allowed me to get enough white balance to depict the coffee beans in their natural colour. A C-stand with boom arm was an effective tool for taking the photo from above and keeping the camera stable.